
Looking for a show-stopping yet simple dessert for your holiday table? This colorful Easter Poke Cake is the perfect centerpiece, combining moist cake, sweet filling, and fluffy frosting. An Easter Poke Cake is a fantastic way to bring a burst of spring color and flavor to your celebration. It’s a fun, interactive dessert that both kids and adults will adore.
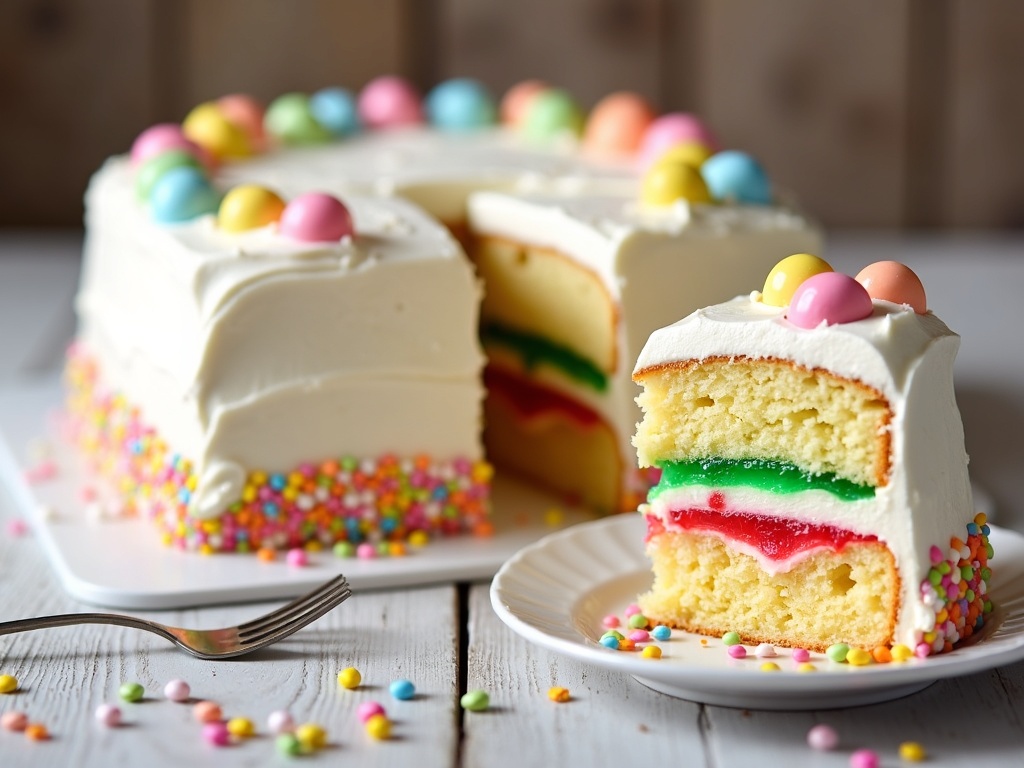
This delightful treat starts with a classic vanilla cake base, which is then transformed with vibrant gelatin. The ‘poke’ technique allows the colorful liquid to seep into the cake, creating a beautiful stained-glass effect when sliced. The final layer of creamy frosting and festive sprinkles makes it irresistibly festive. It’s a guaranteed crowd-pleaser that looks far more complicated than it actually is.
Why You’ll Love This Easter Dessert
This dessert is a winner for so many reasons. First, it’s incredibly easy to make, requiring mostly boxed mixes and simple ingredients. The assembly is straightforward and offers a fun activity for the whole family. Secondly, its stunning visual appeal makes it the star of any Easter brunch or dinner.
The bright colors peeking through the white frosting are simply joyful.
Finally, the texture combination is divine. You get the tender crumb of the cake, the juicy burst of flavor from the gelatin filling, and the light, sweet frosting. It’s a multi-sensory experience in every bite. This Easter Poke Cake recipe is a modern twist on a classic potluck favorite, perfect for the season.
You can find more inspiration for your holiday menu in our collection of seasonal baking ideas.
How to Make the Perfect Easter Poke Cake
Follow this simple recipe to create your own festive masterpiece. The key steps are baking the cake, poking the holes, adding the gelatin, and finishing with frosting. Remember to let the gelatin mixture cool slightly before pouring it over the warm cake. This ensures it absorbs properly without making the cake soggy.
Prep Time: 20 minutes | Cook Time: 30 minutes | Total Time: 4 hours (includes chilling) | Servings: 15
Ingredients
- 1 box (15.25 oz) vanilla cake mix, plus ingredients listed on box (typically eggs, oil, and water)
- 1 cup boiling water
- 1 box (3 oz) strawberry gelatin mix
- 1 box (3 oz) lime gelatin mix
- 1 cup cold water, divided
- 1 container (16 oz) vanilla frosting
- 1 tub (8 oz) frozen whipped topping, thawed
- Pastel-colored sprinkles and jelly beans for decoration
Instructions
- Preheat your oven to 350°F (175°C). Grease and flour a 9×13 inch baking pan.
- Prepare the vanilla cake batter according to the package directions. Pour the batter into the prepared pan and bake for 28-32 minutes, or until a toothpick inserted into the center comes out clean.
- While the cake is baking, prepare the gelatin. In two separate medium bowls, combine each box of gelatin powder with 1 cup of boiling water. Stir for 2 minutes until completely dissolved.
- Stir 1/2 cup of cold water into each bowl of dissolved gelatin. Set aside to cool at room temperature for about 20 minutes.
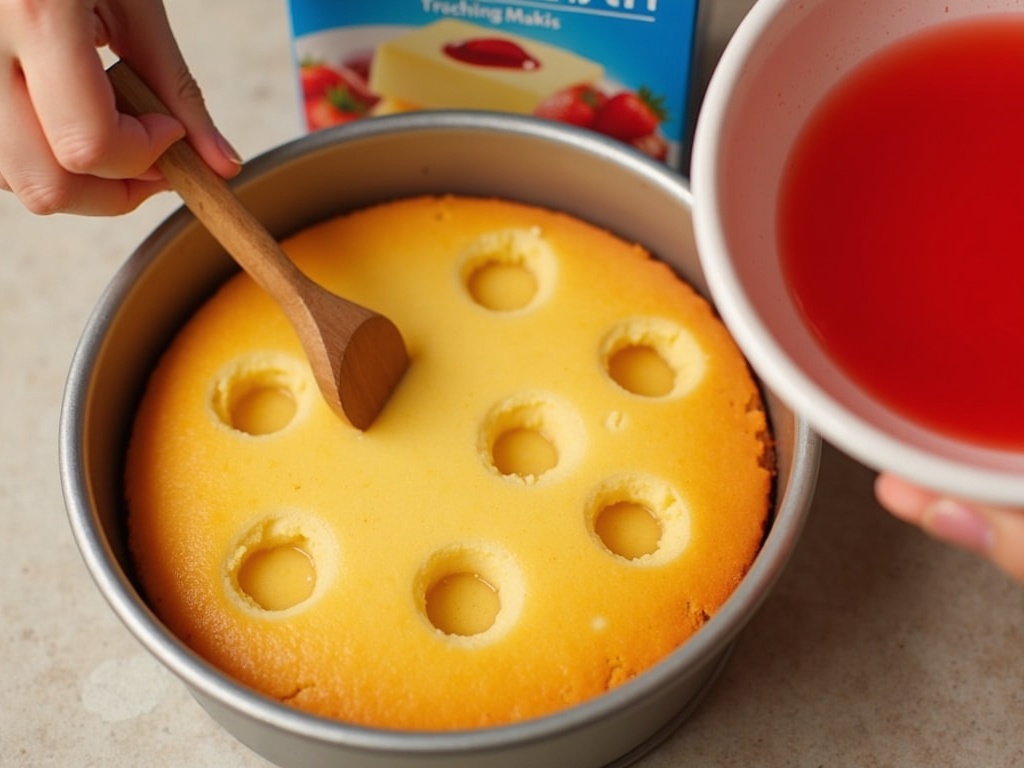
- Remove the cake from the oven and let it cool in the pan on a wire rack for about 15-20 minutes. While still warm, use the handle of a wooden spoon or a similar round object to poke holes all over the top of the cake, about 1 inch apart.
- Slowly and alternately pour the slightly cooled strawberry and lime gelatin mixtures over the warm cake, aiming for the holes. Use a spoon to help guide the liquid if needed. Ensure all the gelatin is used.
- Refrigerate the cake, uncovered, for at least 3 hours to allow the gelatin to set completely.
- In a large bowl, fold together the vanilla frosting and the thawed whipped topping until smooth and combined.
- Spread the frosting mixture evenly over the completely chilled cake. Decorate generously with pastel sprinkles and jelly beans. For best results, return the decorated cake to the refrigerator for 30 minutes before serving.
Tips
- For a homemade touch, you can use your favorite vanilla cake recipe instead of a mix. Just bake it in a 9×13 pan.
- Get creative with colors! Use any combination of gelatin flavors like orange, berry blue, or lemon for different pastel hues.
- To ensure clean slices, dip your knife in warm water and wipe it clean between each cut.
Decorating Your Festive Masterpiece
The decoration is where you can truly make this Easter Poke Cake your own. The classic look involves a smooth blanket of white frosting, but you can get creative with piping bags and tips. Consider adding piped borders or simple designs like Easter eggs or flowers. The sprinkle and candy topping is the final, joyful touch that brings it all together.
Using a variety of pastel sprinkles, nonpareils, and jelly beans creates a delightful texture and visual interest. You can even arrange the jelly beans in a pattern or spell out ‘Happy Easter’. Let your kids help with this part—it’s a wonderful way to involve them in the holiday preparation. The final presentation of this Easter Poke Cake is sure to earn plenty of oohs and aahs from your guests.
Wrapping Up
This Easter Poke Cake is more than just a dessert; it’s a festive activity and a guaranteed hit. Its simplicity, stunning appearance, and delicious taste make it an ideal choice for your spring gatherings. By following these easy steps, you can create a memorable treat that celebrates the season. Don’t forget to check out the history of gelatin desserts on Wikipedia for some fun baking trivia.
Gather your ingredients, have fun with the colors, and get ready to serve a slice of springtime joy with this unforgettable Easter Poke Cake.
Explore a guide on our sister blog
Related reading: Explore more on this topic